Women’s Suit Measurement Guide
How to Measure Yourself for a Women’s Suit
Use this step-by-step women’s guide to taking your own suit measurements for a jacket, waistcoat, trousers or skirt. Measure the body itself with a soft tape and do not add extra room—we calculate the appropriate tailoring allowance.
Repeat each measurement three times, keep the tape level and use either inches or centimetres consistently throughout.
Before You Measure
- Use a flexible cloth or tailor’s tape.
- Wear the bra or support you expect to wear with the suit.
- Stand naturally in close-fitting, lightweight clothing.
- Ask someone to help with shoulders, sleeves and lengths where possible.
Part One
Jacket and Waistcoat Measurements
Wear consistent underwear or support throughout these measurements. Changes in bra shape or support can alter the bust position, front length and the way a tailored jacket sits.
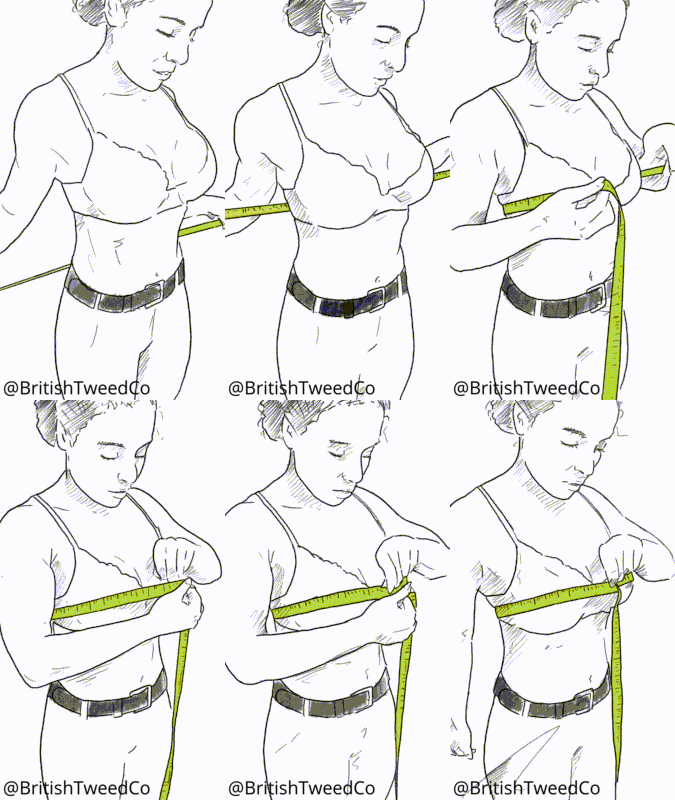
Bust or Chest
Wear the bra or supportive garment you are most likely to wear with the suit. Stand naturally with your arms relaxed by your sides.
Pass the tape around the fullest part of the bust and across the shoulder blades. Keep it level, flat and comfortably close without compressing the body.
Always measure rather than relying on a remembered bra size, as cup and band labels do not provide the complete body circumference needed for tailoring.
Record: the full circumference around the fullest part of the bust.
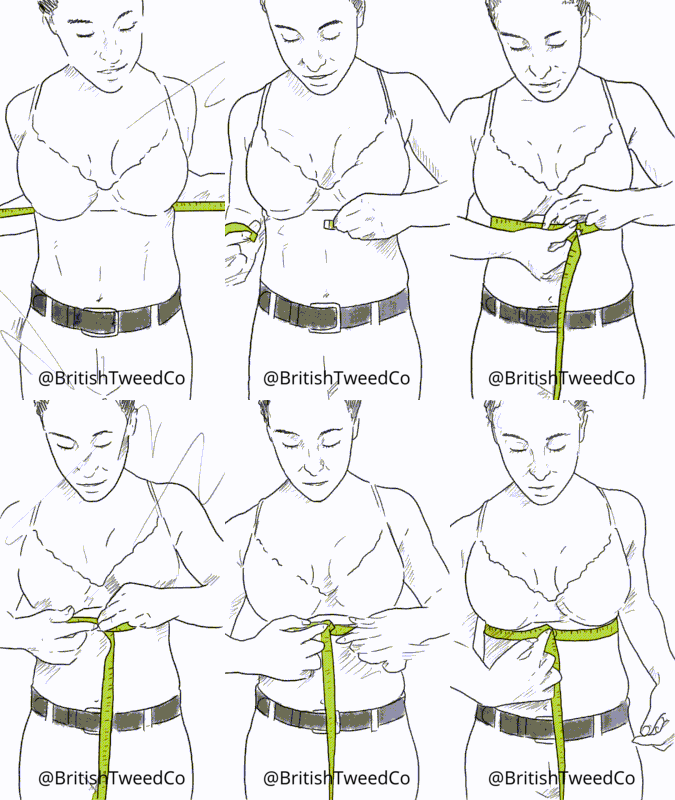
Under Bust
With the same bra or supportive garment in place, measure around the ribcage directly beneath the bust.
Check in a mirror that the tape is horizontal across the back and has not slipped upwards or twisted. Keep it snug but never tight.
The under-bust measurement helps us understand the difference between the bust and ribcage rather than assuming both from one standard dress size.
Record: the circumference directly beneath the bust.
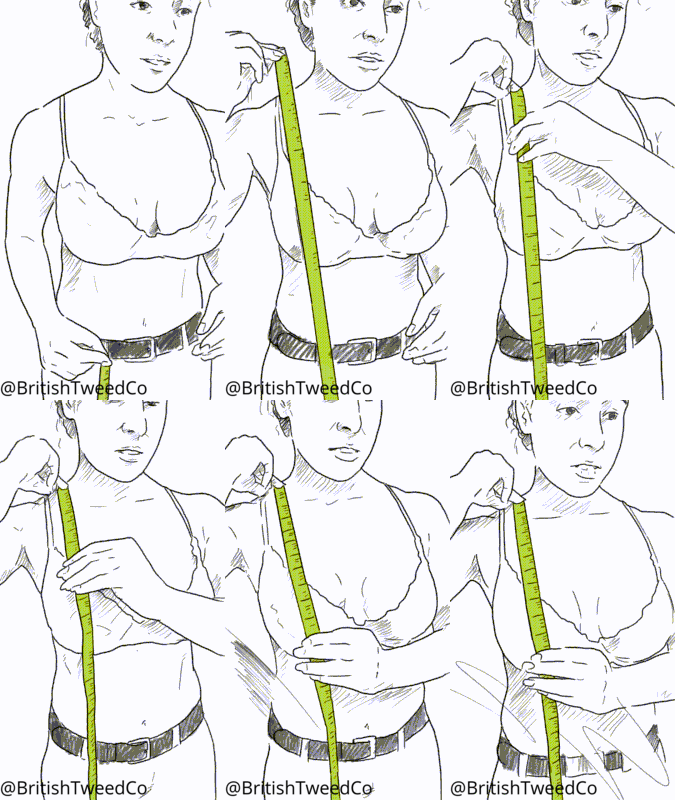
Shoulder Seam to Bust Point
Place the end of the tape where the shoulder seam of a well-fitting jacket or shirt would sit, close to the base of the neck.
Measure straight down over the front of the body to the fullest point of the bust. Do not angle the tape towards the centre of the chest.
This vertical measurement helps position jacket shaping and is affected by the bra being worn, so use the same support throughout the measuring process.
Record: the vertical shoulder-seam-to-bust-point measurement.
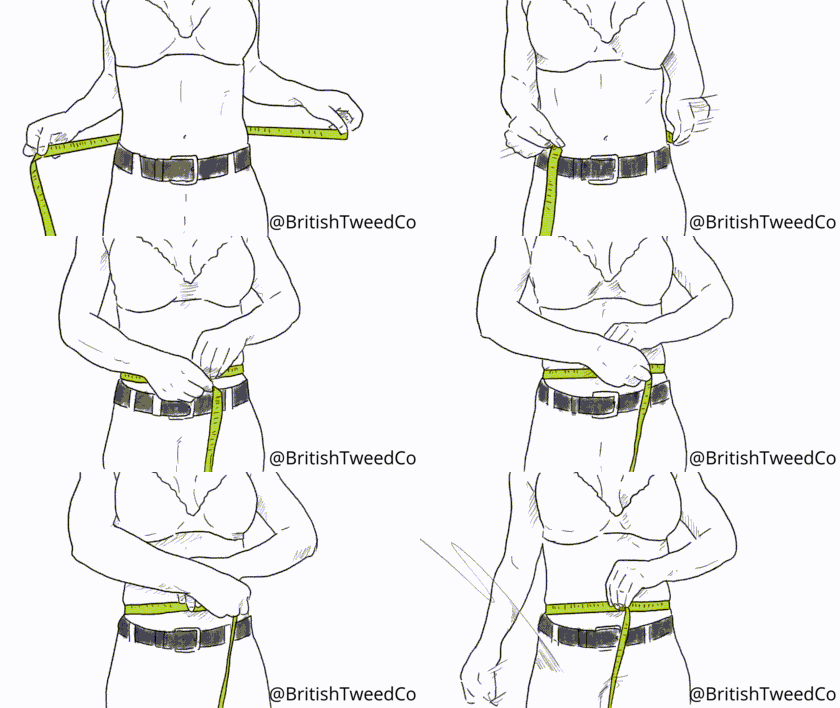
Natural Waist
Stand naturally with your feet approximately hip-width apart. Measure around the narrowest part of the torso, usually above the navel and below the ribcage.
Keep the tape level to the floor and close to the body without pulling it tight. Do not hold your stomach in.
Tieing a narrow piece of elastic around the waist and moving gently for a few moments can help it settle at the natural waistline.
Record: the circumference of the natural waist.
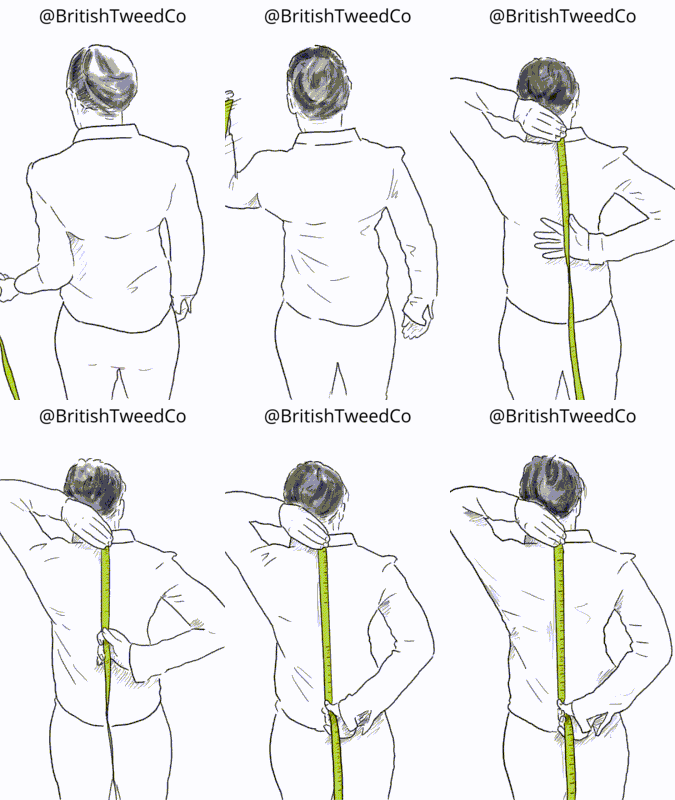
Nape to Natural Waist
Find the base of the neck at the centre back, where a shirt collar seam would sit.
Measure vertically down the centre of the back to the natural waist position identified in the previous step. Keep your posture relaxed rather than standing unusually straight.
This measurement helps place the jacket waist in relation to your own torso length.
Record: the centre-back length from the nape to the natural waist.
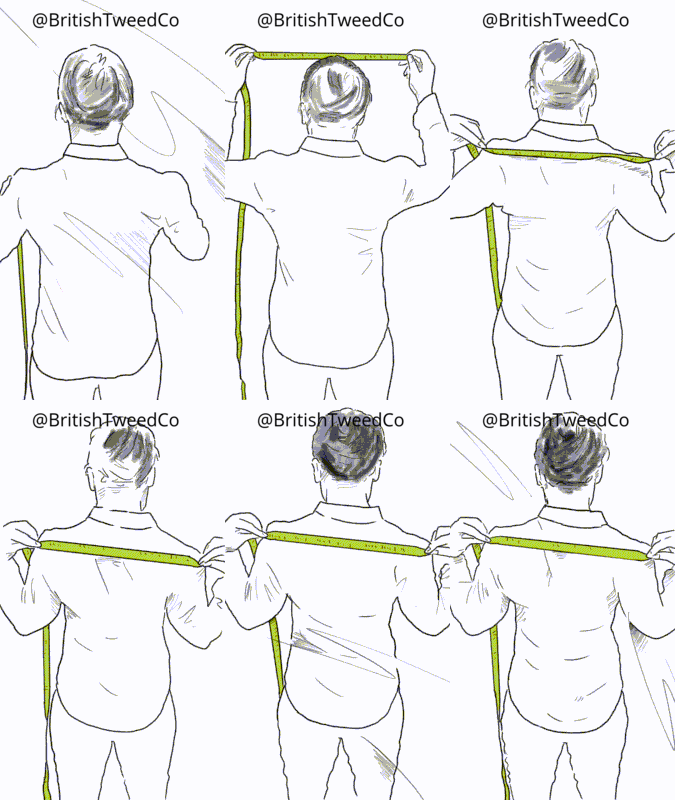
Shoulder Width
Measure across the upper back from the outer end of one shoulder to the outer end of the other.
Allow the tape to follow the natural curve of the back rather than pulling it into a perfectly straight line.
Where the shoulder points are difficult to identify, measure between the shoulder seams of a jacket or shirt that fits well.
Record: the curved shoulder-point-to-shoulder-point measurement.
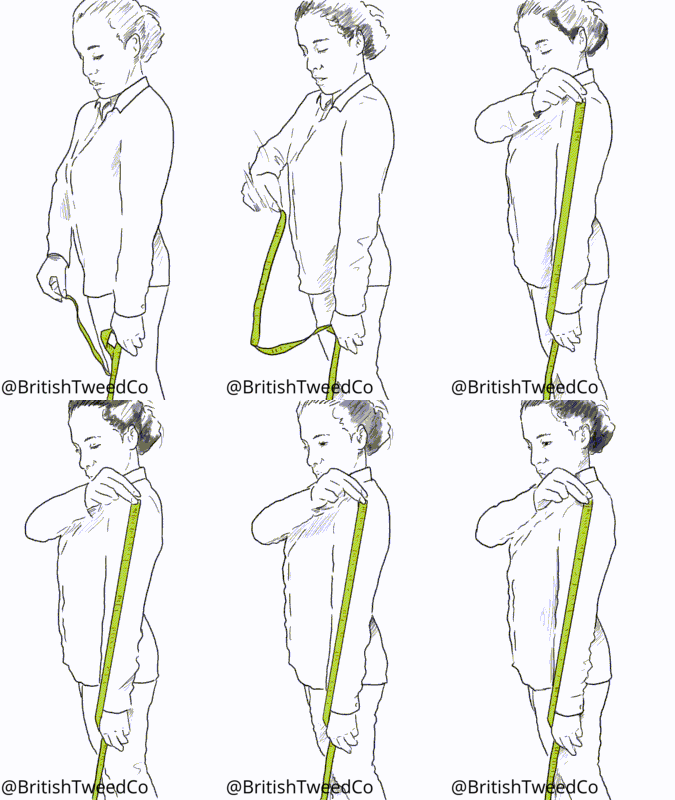
Sleeve Length
With the arm relaxed naturally at your side, measure from the outer shoulder point down the outside of the arm to your preferred sleeve finish.
A classic jacket sleeve normally ends around the wrist bone or base of the thumb, allowing a small amount of shirt cuff to show.
Measure both arms separately when one shoulder sits lower or one arm is noticeably longer.
Record: the shoulder-point-to-sleeve-end measurement for each arm where required.
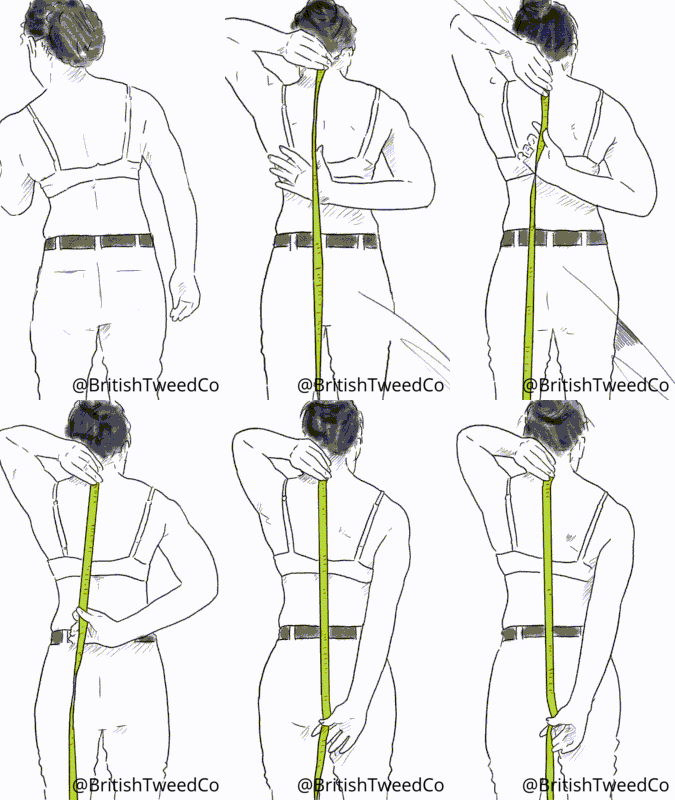
Rear Jacket Length
Measure from the centre-back collar seam at the base of the neck to the preferred finished jacket hem.
Women’s jackets can be cut shorter, traditionally tailored or longer-line depending on body proportion and styling preference. Use a well-fitting jacket as a visual reference where helpful.
Lift the collar before measuring an existing jacket so that you begin at the true collar seam rather than the collar edge.
Record: the centre-back collar seam to the desired jacket hem.
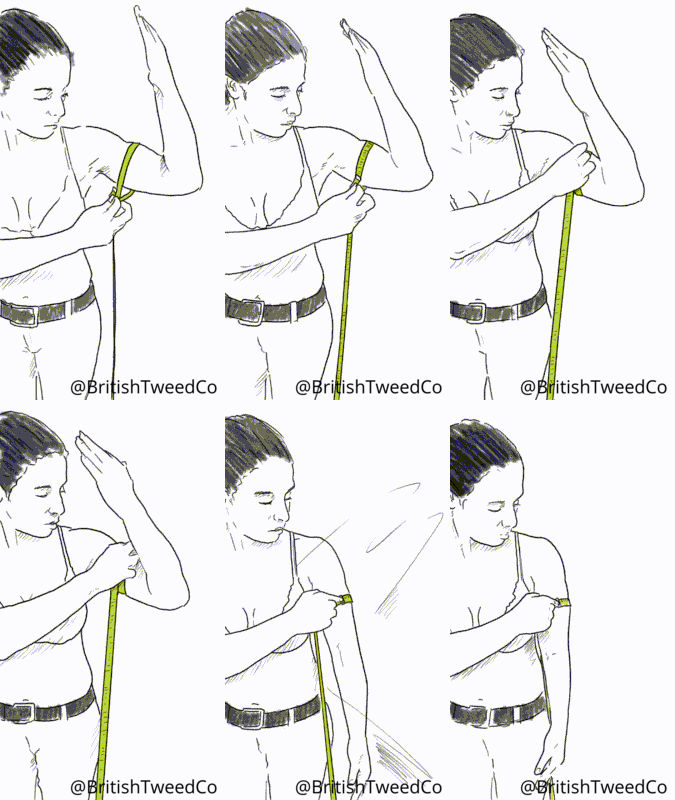
Bicep or Upper Arm
Locate the widest part of the upper arm, then relax the arm by your side before taking the circumference.
Keep the tape comfortably close without compressing the arm. Do not provide a flexed measurement unless specifically requested.
This is particularly useful for fuller or muscular upper arms and when you have previously found jacket sleeves restrictive.
Record: the fullest relaxed upper-arm circumference.
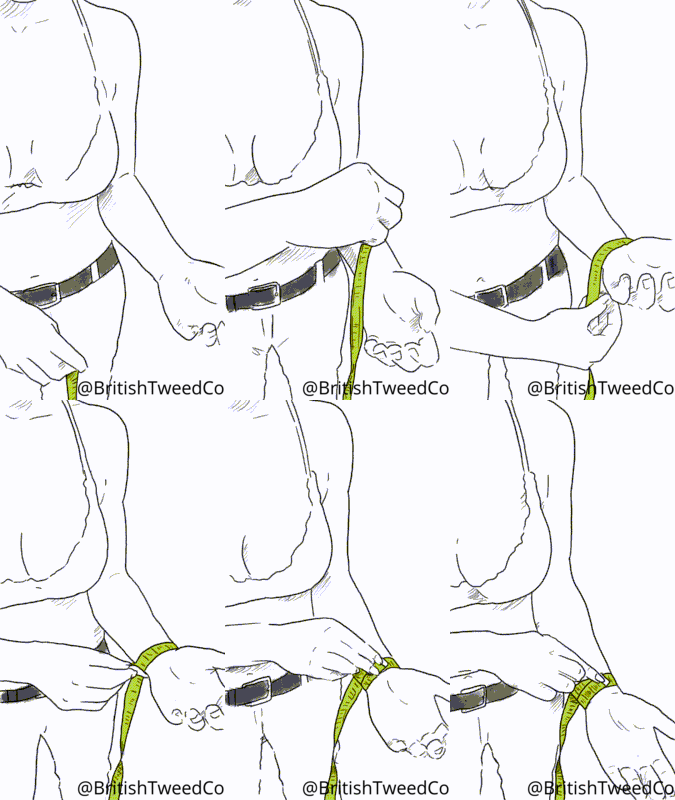
Wrist
Measure around the wrist at the point where the jacket sleeve is intended to finish.
Keep the tape snug but not tight. Mention a watch, medical device or other consideration where you need additional room on one side.
Record: the wrist circumference at sleeve-end height.
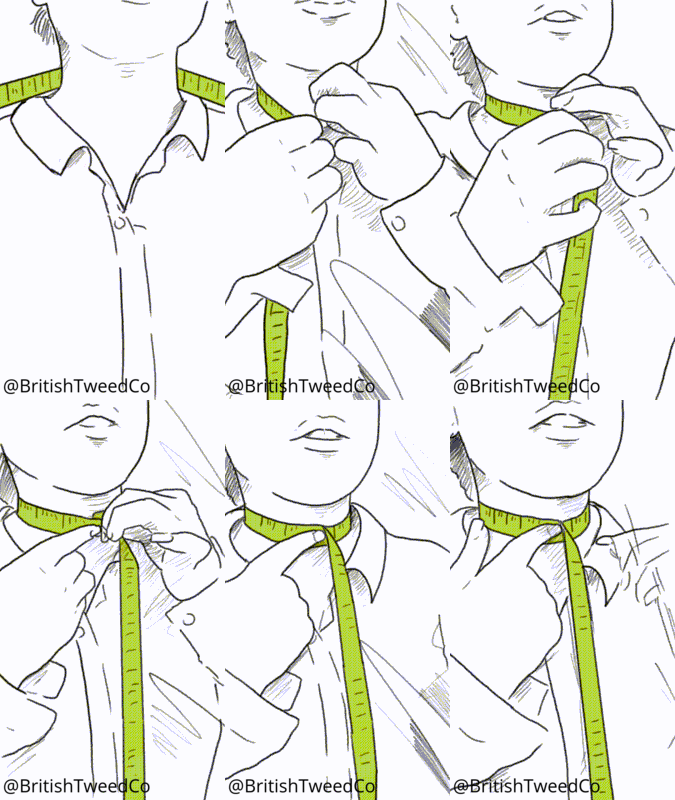
Neck or Collar
Measure around the base of the neck at the height where a shirt collar would naturally sit.
Keep the tape comfortably close and level. A well-fitting collared shirt can help identify the correct position.
Record: the neck circumference at collar height.
Waistcoat Length
Measure from the centre-back collar seam to the preferred waistcoat finish. The front must cover the trouser or skirt waistband when standing naturally, so tell us the intended waistband height as well.
Fullest Abdomen
Where the fullest part of the abdomen sits below the natural waist, measure that circumference separately. This is useful when the waist and lower torso differ significantly from a standard dress-size proportion.
Height and Weight
Record your current height and weight. They do not replace body measurements, but they help us sense-check the complete set and spot possible transcription errors.
Right and Left Differences
Tell us about dropped shoulders, different arm lengths, asymmetry or any area where one side fits differently. Provide separate right- and left-side measurements when requested.
Which upper-body measurements are essential?
Bust, natural waist, hips or seat, shoulder width, sleeve length and height provide the core information. Under bust, shoulder-to-bust, upper arm and vertical lengths become especially valuable where standard women’s jackets commonly pull, gape, sit too high or feel restrictive.
Part Two
Trouser Measurements
Begin by deciding exactly where you want the waistband to sit. Use the same waistband position for waist, rise and trouser-length measurements.
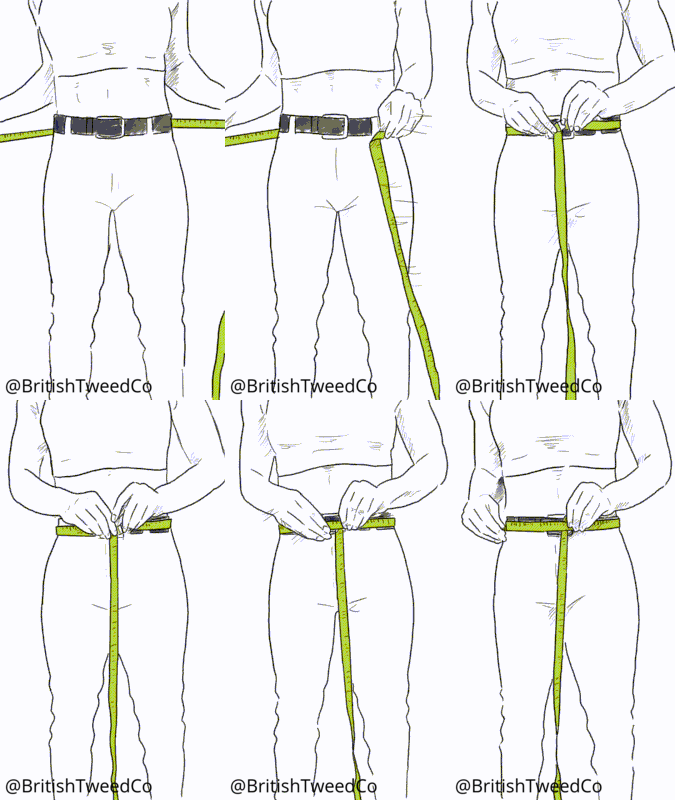
Trouser Waist
Measure around the body at the exact height where you want the trouser waistband to sit. This may be lower than the natural waist.
Keep the tape level and close to the body without tightening it. A pair of well-fitting formal trousers can help you identify the preferred height.
Use this same waistband position when taking the outseam and total-rise measurements.
Record: the complete circumference at the chosen trouser-waist height.
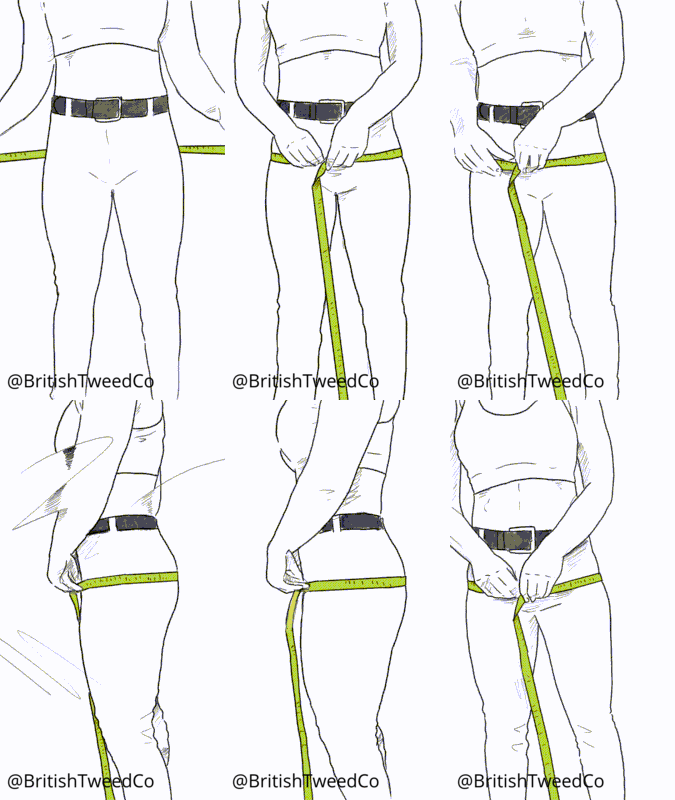
Hips and Seat
Stand with your feet approximately hip-width apart and your pockets empty.
Pass the tape around the fullest part of the hips and seat. Check from the side and back that it remains level and has not ridden upwards.
The tape should lightly touch the body without flattening or compressing it.
Record: the fullest circumference around the hips and seat.
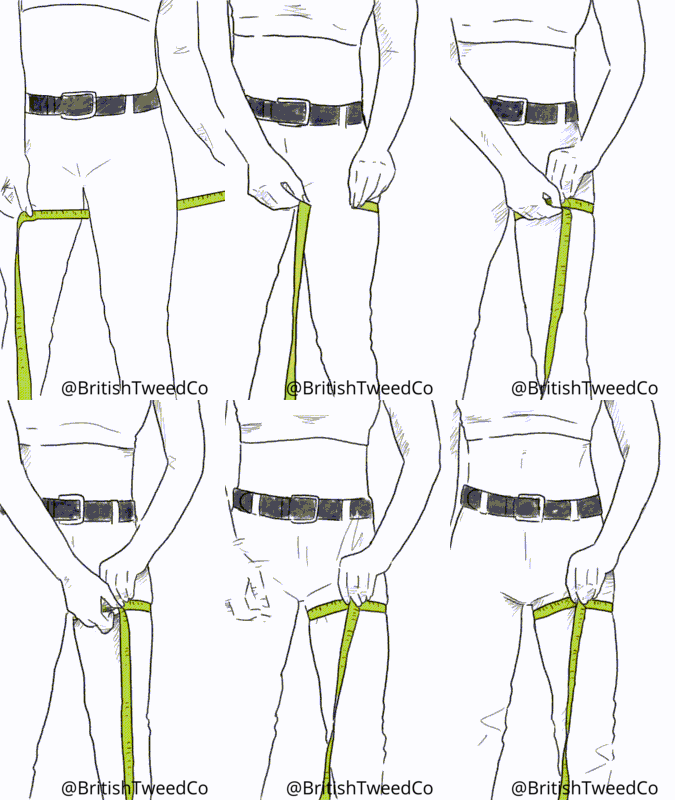
Thigh Circumference
Measure around the widest part of one thigh, usually close to the top of the inside leg.
Keep your weight evenly distributed and the leg relaxed. The fullest point may sit slightly lower depending on body shape or muscular development.
Measure both thighs separately where there is noticeable asymmetry.
Record: the fullest thigh circumference.
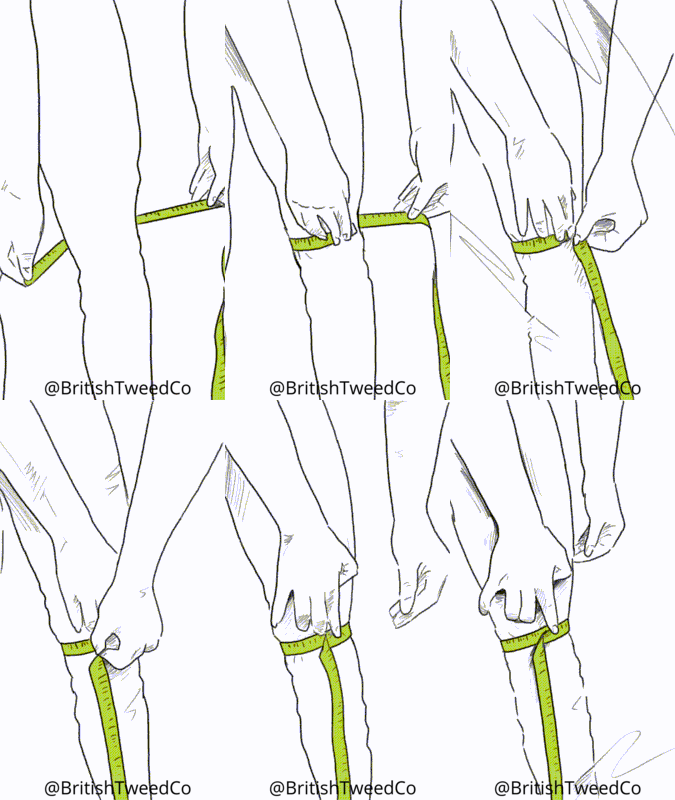
Knee Circumference
With the leg straight and relaxed, measure around the widest part of the knee.
Keep the tape horizontal and comfortably close. This measurement is especially useful where the knee or lower leg is a frequent fit concern.
Record: the knee circumference.
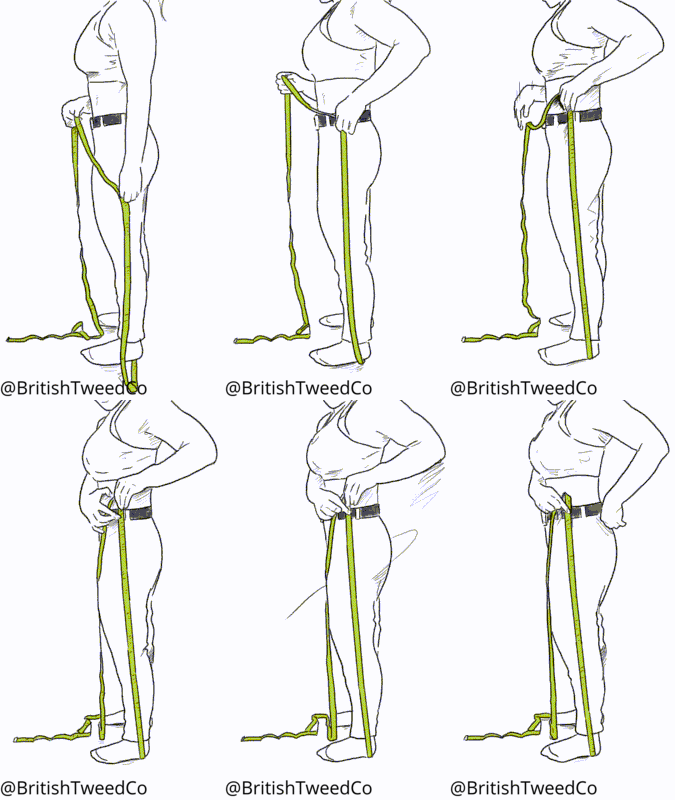
Outseam or Trouser Length
Starting at the top of your chosen trouser-waist position, measure vertically down the outside of the leg to your preferred finished hem.
Wear shoes with a similar heel height to those intended for the suit. The correct length depends on the trouser shape, shoe and amount of break you prefer.
Do not automatically stop one or two inches above the floor; use the actual finished position you want while wearing the intended style of footwear.
Record: the side measurement from the waistband to the finished hem.
Inside Leg or Inseam
Measure from the top of the inside leg down to the preferred finished trouser hem.
Keep the tape following the inside seam line and wear shoes of a similar height to those intended for the suit.
A well-fitting pair of trousers can also be measured flat from the crotch seam to the hem, but tell us when a measurement has been taken from a garment rather than from the body.
Record: the inside-leg measurement from crotch to finished hem.
Crotch or Total Rise
Place the tape at the front of your chosen waistband position, pass it between the legs and continue to the same waistband height at the centre back.
Keep the tape smooth and untwisted, following the body comfortably without pulling it tight.
This measurement is particularly useful where trousers commonly feel too short or too long through the rise.
Record: the full front-waist-to-back-waist measurement.
Calf
Measure around the widest part of the calf with the leg relaxed. This is useful for strong or fuller lower legs and when a closer trouser silhouette is requested.
Body Changes or Swelling
Tell us where measurements fluctuate or swelling affects one or both legs. Take measurements at the time of day most representative of how the garment will be worn and include separate sides where requested.
Part Three
Skirt Measurements
A tailored skirt needs a clearly defined waistband position, the fullest hips-and-seat measurement and an exact finished length. Do not rely only on a usual dress size.
Skirt Waist Position
Measure around the exact position where you want the skirt waistband to sit. This may be at the natural waist or slightly lower depending on the style.
Keep the tape level and close to the body without pulling it tight. Use the same position when measuring skirt length.
Record: the circumference at the intended skirt-waist position.
Hips and Seat for a Skirt
Measure around the fullest part of the hips and seat with your feet approximately hip-width apart.
Check that the tape is level from every angle. This measurement is essential for the skirt to fall cleanly without pulling across the hips or seat.
Record: the fullest hips-and-seat circumference.
Skirt Length
Measure from the top of the intended waistband position vertically down the centre front or side to your preferred finished hem.
Stand in the shoes you expect to wear and ask someone to check the tape remains vertical. Record the exact finished length rather than simply requesting knee length or below the knee.
For reference, our tailored and longline skirt options have different proportions, but Made to Measure allows the requested finished length to be considered against your height and shape.
Record: the waistband-to-finished-hem measurement.
Body Size vs Finished Garment Size
Give Us Your Body Measurements—Do Not Add Room.
Measurements such as bust, waist, hips and upper arm are body measurements. They describe the person the garment is intended to fit, not the finished circumference of the jacket, trousers or skirt.
The finished garment needs additional room for movement, comfort and the layers worn underneath. This is known as ease or overmeasure, and we calculate it according to the garment pattern, service and intended silhouette.
Keep the tape close without compressing the body and enter the number you actually measure. Do not add an inch or two yourself, as doing so can result in the allowance being added twice.
Only provide a finished-garment measurement when the order form or our team specifically asks for one.
Women’s Guide to Taking Your Own Suit Measurements
Tailoring Should Follow Your Proportions.
Women’s tailoring has too often relied on a limited range of standard proportions. Two people may share the same dress size while having very different bust, waist, hip, shoulder and torso measurements.
Taking accurate body measurements allows the jacket waist, sleeve shape, bust position, trouser rise and skirt length to be considered separately rather than inferred from a single number.
This guide keeps the established women’s suit measurement topics while adding clearer guidance for inside leg, rise, waistcoat length, skirts, asymmetry and areas that may not follow a conventional size chart.
Which Service Uses These Measurements?
Made to Order and Made to Measure Are Different.
The full guide is primarily for full Made to Measure, although body measurements are also useful when choosing a listed Made to Order size or arranging a confirmed adult extended-size accommodation.
Standard Sizing with Personal Styling
Made to Order
Made to Order normally uses our listed women’s sizing, shown in UK sizes with US equivalents where applicable. You can still choose the jacket length, trouser or skirt options and other styling details available on the product.
Use your bust, waist and hips to compare against the size guide. If your adult size is not listed, contact us before ordering: subject to tailoring suitability and confirmation, individual measurements can be used with standard Made to Order styling at the equivalent Made to Order price.
Explore Made to OrderIndividual Body Measurements
Made to Measure
Made to Measure uses your individual measurements to account for bust-to-waist balance, hip and seat proportion, torso and sleeve length, trouser rise, asymmetry and other personal fit requirements.
It also provides deeper styling control, including additional jacket and lapel choices where available.
Explore Made to MeasureOptional Sizing Protection
Worried About Choosing a Size or Taking Measurements?
Fit Assurance is a specific optional service available with every Made to Order and Made to Measure suit. It provides a defined fit-resolution process where a significant sizing issue remains after delivery.
Depending on the evidence and what can reasonably be altered, the resolution may involve alterations, one or more remade pieces, or the complete covered suit.
Read About Fit Assurance- Purchased separately for each suit you wish to cover.
- May cover one garment, several pieces or the complete suit.
- All affected pieces must be reported together.
- Every piece approved for remake must be returned.
- Remakes use the normal estimated production period.
Measurements Beyond a Standard Size Chart
Tell Us What Usually Does Not Fit.
Bodies are individual. You may be petite or tall, broad or narrow through the shoulders, fuller through the bust, waist, hips or upper arms, or have proportions that vary noticeably from one side to the other.
We can also consider mobility requirements, disability, fluctuating measurements, swelling or conditions such as lymphoedema. Describe the practical problem clearly and provide separate measurements or photographs where requested.
If your adult size is not listed, we can accommodate almost any size or proportion. Subject to tailoring suitability and confirmation, individual measurements can be used with standard Made to Order styling at the equivalent Made to Order price, so you will not pay more solely because your size falls outside the chart.
For photographs, wear fitted clothing and show the relevant measurement with the tape visible, level and readable. Avoid sending intimate photographs; clear clothed images are sufficient.
Women’s Suit Measurement Questions
Before You Submit Your Measurements.
Should I measure over clothing?
Wear close-fitting, lightweight clothing and the bra or support you expect to wear with the suit. Avoid measuring over thick knitwear, loose garments or shapewear that will not be worn with the finished outfit.
Should I add extra room to my measurements?
No. Provide the body measurement itself. We add the appropriate ease or overmeasure according to the garment pattern, service and intended silhouette.
What if my bust, waist and hips fall into different standard sizes?
This is common. Use all three measurements when comparing Made to Order sizes and contact us when the difference is substantial. We will confirm whether the standard Made to Order styling can be retained through a sizing accommodation or whether the broader proportion and styling controls of full Made to Measure would be more suitable.
Do I need every measurement shown on this page?
Not for every order. Bust, waist, hips or seat, sleeve length, height and the relevant trouser or skirt lengths are the core measurements. Additional measurements help where a particular area has caused fit problems or when our order form requests them.
Should I measure both sides?
Measure both arms or legs when there is a noticeable difference, asymmetry, swelling or a mobility consideration. Label the right and left measurements clearly.
Can I measure a garment that already fits me?
An existing jacket, pair of trousers or skirt can help confirm lengths and preferred waistband positions. Body measurements and garment measurements are not interchangeable, so clearly state which method you used.
What should I do when two measurements are different?
Repeat the measurement while checking the tape position and posture. If the readings continue to differ, send both values or contact us rather than averaging a measurement you are unsure about.
Your Suit, Your Style
Use Your Measurements to Find the Right Starting Point.
Explore women’s tweed suits, tailored skirts and our Made to Measure service, or contact us before ordering when you would like help checking your measurements.